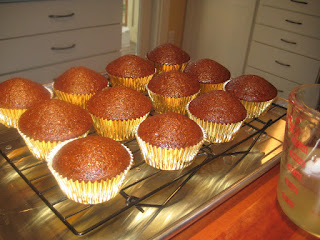
Gingerbread cupcakes with Mango Buttercream Frosting. My husband's uncle and aunt came by for a visit so my sister (who was also visiting) and I decided to make this award-winning cupcake. Uncle Fred's comment after tasting it said, "this is the best cupcake I've ever eaten!" He said that a couple of times, so I'm going to have to believe him. Makes the incredible amount of effort worth it. Rather than list what I learned, I'd rather summarize the 2 pages of directions it took to make these. That will be at the end of the post. For now, though, be advised: do not attempt to make these unless you have a lot of time and energy on your hands. And if you make them, be prepared to taste yumminess! And I don't even like gingerbread-tasting stuff!
 I chose gold wrappers because the crystallized ginger is gold. I thought it turned out pretty well.
 The recipe said to brush the tops of the "just baked" cupcakes with a ginger glaze. But I forgot to do that when they first came out of the oven. I did it several minutes later, decided that they weren't getting very glazed, poked tiny holes in them, re-glazed, decided they still weren't moist enough, cut the tops off and then poured the glaze in with a spoon. Talk about moist and yum!
 When Jayden saw me poking holes in the cupcakes, he jumped to assistance. He probably poked 30 holes in each one!
 If you look closely, you can see how the cupcake looks dry on the inside but more moist near the edges.
 Finished product. We garnished the tops with huge chunks of candied ginger which we promptly removed before eating them.
 I chose gold wrappers because the crystallized ginger is gold. I thought it turned out pretty well.
 The recipe said to brush the tops of the "just baked" cupcakes with a ginger glaze. But I forgot to do that when they first came out of the oven. I did it several minutes later, decided that they weren't getting very glazed, poked tiny holes in them, re-glazed, decided they still weren't moist enough, cut the tops off and then poured the glaze in with a spoon. Talk about moist and yum!
 When Jayden saw me poking holes in the cupcakes, he jumped to assistance. He probably poked 30 holes in each one!
 If you look closely, you can see how the cupcake looks dry on the inside but more moist near the edges.
 Finished product. We garnished the tops with huge chunks of candied ginger which we promptly removed before eating them.
Summary of steps it took to make these:
1. Make batter. Not too hard; used powdered ginger.
2. Make glaze: peel and mince ginger, boil in sugar water for 2 minutes; let sit for 20, remove ginger pieces.
3. Make frosting: Peel and cut 3 mangoes, cook them slowly till they caramelize, push them through a mesh strainer to remove all "hair." Literally the hardest part! Serious forearm workout. Mangoes are hairy!
4. Separate 6 eggs, watch your 4-yr-old experiment with eggs, clean up his mess, beat the eggs.
5. Cut up 1 lb! of butter and beat into the eggs with sugar and alternate mango mix with water.
Okay, so it doesn't sound like much in retrospect. I guess what made it immensely more difficult is that my sister was also whipping up 4 different kinds of gourmet salads at the same time in my little space and on my stove while my 4-year-old was getting into everything. So, I take back my other statement. You don't need a lot of time and energy to make these. You just need to have the kitchen to yourself and put your kids to bed. Then you can enjoy the most tasty mango buttercream frosting - ever! atop very moist gingerbread cupcakes.


