Wednesday, November 23, 2011

Pumpkin Pie a la Cupcake


Mini Pumpkin Pies are actually spiced pumpkin cupcakes with buttercream frosting on top.  I did sprinkle a little sanding sugar on top for a little sparkle.  Maybe should do that on my regular pumpkin pies too.  Hmmm. . .

The "pie top" and "whip cream" and "crust" are all the same frosting, just colored differently.


I used silver liners in an effort to mimic the pie pans.  But an a nice, bright orange liner would be beautiful too.

I made sure to fill them up minimally because I would have to have a level top and didn't want to waste too much of the cake.  I cut off any peak because I don't believe I have ever seen a pumpkin pie with a mound on it.


After I sliced off the top, I added about 1 T of simple syrup to each cupcake to make it moist.


I mixed my buttercream frosting with a copper-colored food paste.  I even added a little cocoa as suggested by the Hoosier Homemade Blog.  I'll be honest, the entire idea came from that website, with the exception of the sanding sugar sprinkles.


This is the crust frosting.  Just mixed it with a little cocoa.  
This picture is kind of weird.  Looks a little like mashed potatoes.  


 I used  a flat piping tip to do the "crust".  It has little ridges on the other side but I just kept it on the flat side.  Some crusts turned out better than others.  I sprinkled them with cinnamon because I was not at home and couldn't find any nutmeg at my MIL's house.  My niece said that the cinnamon flavor on the top was her favorite part of it so that was great.  But I also think the nutmeg would give a nicer finish since it's not so powdery.  Is there a way to fresh-grate cinnamon?  That would probably be the best! 


 My little nieces, Ellie and Katie, both helped pipe the crust on.  They're so cute!


Maci wasted no time in devouring her cupcake. 

Tuesday, November 1, 2011

Brain Food

If you want to be brain healthy and extra smart: I wouldn't recommend eating these! 
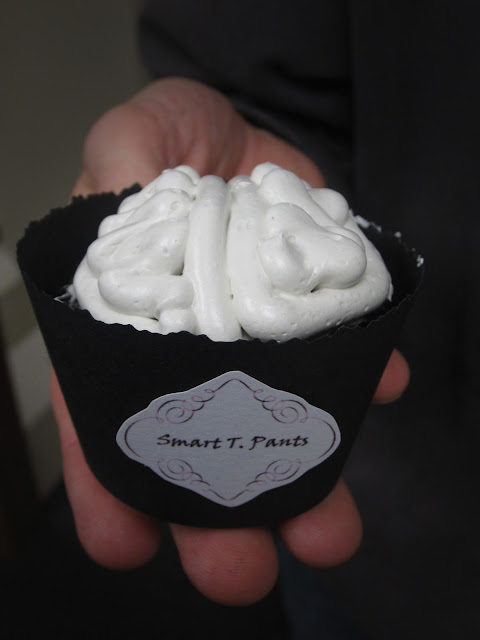
Rich chocolate cake with a Swiss meringue buttercream "brain".  

The cupcake sleeves were traced onto black scapbooking paper then I made signs and glued them on.  The crinkle cut at the top of the cupcake sleeve adds a fun touch.  


The frosting seemed like it had too many air holes.  I'm not sure why that happened.  
The recipe recommended that it be whipped for a long time to insure that the bubbles were out.  
I whipped it but still . . .


I  borrowed most of the names from Martha Stewart.  But I came up with a few as well.  
The lame ones are likely mine.  :)
 We had: Smart T Pants, Sir Thinks-a-Lot, Albert Mindstein, Intell E Gent, Ima Wiseman, Clever Clive, Mr. Know-it-All, Al Weighs Right, Whitt E. Banter, Mrs. Anne Sirs, Ms. Bright Brain, and Smart Alec, which I accidentally typed as SNart Alec.  Nice, right?


Brains were made by piping a D shape on one half of the brain then filing in the D with squiggly brain matter.  Repeat on the other side.
The frosting was tinted grey (like grey matter) but I think I could have made it even more grey; looks too white. 


Brains actually took some piping practice.  I had the wrong size piping tip and no luxury to go to the store to buy the right one; one kiddo sleeping and one all up in my business.  I could have used the good ol' fashioned ziploc but the holes I cut in the corner of the bag tend to have an edge to them; no good.  
Some of the brains were so poorly done that I scraped them off and tried again.  Eventually I got tired and called it "good enough."  


I've included a jpg image of the cupcake sleeve and the brain tags.  Save the image in your files then open it up on Word or whatever.  The brain tags should each be about 1.5 inches wide.  The sleeves should be stretched to 9.25 inches.  Print out the sleeve, trace it on cardstock or chipboard and use the more firm template as your stencil.  


Polka Dot in B&W

These cupcakes were decorated in a black and white theme but you should also know that the pictures are posted in black and white to add punch to the contrasting colors. 

I love the wrappers.  They gave the otherwise fun-looking cakes a fancier touch.  


I made a gluten-free chocolate cake and filled each cupcake with a dairy-free ganache.
I used Bob's Red Mill "Gluten Free All Purpose Flour" when the recipe called for flour.  
I chose this flour for the cupcakes because it creates a softer, more gooey cupcake.


 I usually fill my cupcakes with a piping bag and small tip but the squeeze bottle works great too.  
In fact, I may venture to say that it works better! 

The ganache shouldn't be hot when piping into the cupcake centers.  I made the ganache, waited only until it was room temp then filled the cakes.  A little bit oozed out of the middle so I let it cool and harden slightly before removing the little mounds of extra ganache off the top of the ones I frosted white.


Picture on the left is the original, picture on the right is in greyscale. 
Not much different; just enough to make it pop.  

Saturday, October 22, 2011

Spider Season


These sad little cupcakes are the second set I made this morning.  The first set was the candy corn.
The original idea was to make a cupcake with white frosting/black web and another with black frosting/white web.  Apparently it's difficult to find black frosting.  

The ball is a pretzel m&m.  They're very crunchy so I'm hoping it will add a little to the gross factor.  
I'm sure eating a real spider would be crunchy too . . .


 The kids were very interested in the process.  Maci chose to make red spiders when she grabbed a ball and put it on the cupcake.   The tray looks very bland without the black paper underneath.  
Ideally, we would have alternated spider and web but the kids really wanted more spiders.  


Jayden was actually the mastermind behind the spiders.  I just used one ball and added 8 legs.  
He insisted that we needed another ball for the head.  I told him I didn't remember spiders having 2 segments so he sang a little song for me,
 "Did you ever see a spider, a spider, a spider?  Did you ever see a spider with TWO body parts?"

I'm glad he insisted, it looks WAY better with the head.  


I can't seem to get a good web.  This doesn't look like Martha's webs. 
 I need to do some more research and figure out how it's done.  


Candy Corn Flowers

I am a little low on easy cupcake design ideas.  Running out of steam after my favorite min-pumpkins.
Kind of feel like I can't top that when it comes to detail.
So now look what I've done.  I wanted to make some fall cupcakes for a lunch party today so here we go.


It's actually a yellow cake mix.  First time I've used that for cupcakes.
Candy corn around a brown mini m&m.  

My 6-year-old did all the candy corn designs!  He's such an excellent helper!

I really think the paper on the tray adds a special touch.


Saturday, October 15, 2011

Mini Pumpkins

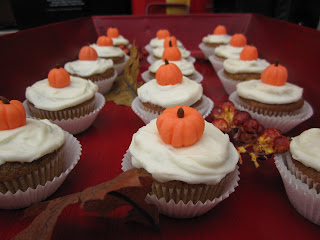
Pumpkin Spice Cupcake, Cream Cheese Frosting, and little fondant pumpkin.  

And NO, the pumpkin is NOT the store-bought variety (aka, round version of candy corn).  

I could have done a green stem or leaf but I wanted to use only oranges and browns for a very earthy look.  I think it turned out well.  When I think of fall colors I see a lot of orange and brown and some reds and yellows.  I know there's always green grass and blue sky but not in my head . . . or in Seattle . . .

And how about the staging?  Annetta inspired me with her little book Plate to Pixel.


Trader Joe's comes through for me once again!  Don't be disappointed, Martha!  I made homemade pumpkin waffles this morning complete with folded-in egg whites!  


The pumpkin bread mix, looking pretty good.


 My pumpkins were accused of looking like the store-bought kind.  Shame!  
Martha would have noticed right away that these are of superior quality and craftsmanship.
I colored white fondant to make orange, then rolled them into balls, squashed them a little, then used a toothpick to create the lines, by laying the toothpick down along the length of the curve.  
Stem is a super tiny piece of pre-colored brown fondant, about the size of those long sprinkle-things.  
I just didn't have any of those sprinkles on hand.  


They were enjoyed at a church appetizer luncheon.  


Sunday, October 9, 2011

Hello Kitty

What fun these cupcakes were!  And they actually turned out alright.  


 I mixed my own pink fondant.  Here's some suggestions for doing it:
1.  Using surgical gloves is recommended so you don't get dye all over your hands.
2.  Use paste food coloring, rather than liquid.  That way it will not get too sticky and wet.
3.  If the fondant gets too sticky or wet, let it air dry for a minute or two or add a little bit of powdered sugar.


 Just thought Maci's little fingers were cute.  When I wasn't looking, she tore into the fondant and stuffed a bunch in her mouth.  She's such a sugar-hog!


 Jayden cut out the flowers for me.  He washed his hands very thoroughly and then let the air dry for about 5 minutes.  Moisture on hands will make fondant work very difficult.


 After the flower is cut it looks like the one on the right.  Taking a little extra time to soften out the edges with your fingertips will be worth the extra effort.  On the left looks much nicer.


 I cut out the ears with scissors and kind of shaped them with my hands.  I ended up making them too big and would recommend that they be more rounded, less long.


 I placed frosting underneath the fondant face to add some moisture and yum to the cupcake.
Use Wilton's "Food Writers" to draw whiskers on the fondant.  Food Writers can be purchased at any craft store in their baking section.   Very cool.


Elise was one of the first little girls to enjoy the fun Hello Kitty mini cake.

Thursday, August 4, 2011

Papa's Seagulls

My father-in-law is a seagull scientist so, in his honor, 
the kids and I made these on our last weekend at the cabin.


 Tying the little licorice lace around each set of three sticks was no easy task. 
Perhaps next time I will "glue" the sticks together with a little frosting before garnishing them with lace.


 Oh, but they do look cute, don't they?


 Because I got tired of making the piers, I thought it would be just fine to 
have some seagull floating on the water.  They do that, you know. 


 This sad little gull had a rough time.
First of all, the marshmallows are a pain in the neck
to cut out.  They're all gooey and sticky and smush when you try to cut them. 
I tried using a knife, a scissor, a round cookie cuter.  I ended up using the scissor.
Now that I'm thinking about it, I wonder if running my scissors through
a little flour would have helped them to not get so sticky.  Hmm. . .


 The "wing" on the side was supposed to be a little curled bit of frosting.  
But as you can see with this close-up guy, my frosting got a little smushy.  
The ziploc bag was getting tired.  


 Oh, yes, and of course, I weighed the batter again.  I'm really liking this system of perfection.


Perfectly baked.  Although the "blue" cake batter looks a little seafoam green.  
But that's accurate, right?


The kids loved them so they were a success.
Never making them again, though. . .