Saturday, October 22, 2011

Spider Season


These sad little cupcakes are the second set I made this morning.  The first set was the candy corn.
The original idea was to make a cupcake with white frosting/black web and another with black frosting/white web.  Apparently it's difficult to find black frosting.  

The ball is a pretzel m&m.  They're very crunchy so I'm hoping it will add a little to the gross factor.  
I'm sure eating a real spider would be crunchy too . . .


 The kids were very interested in the process.  Maci chose to make red spiders when she grabbed a ball and put it on the cupcake.   The tray looks very bland without the black paper underneath.  

Ideally, we would have alternated spider and web but the kids really wanted more spiders.  


Jayden was actually the mastermind behind the spiders.  I just used one ball and added 8 legs.  
He insisted that we needed another ball for the head.  I told him I didn't remember spiders having 2 segments so he sang a little song for me,
 "Did you ever see a spider, a spider, a spider?  Did you ever see a spider with TWO body parts?"

I'm glad he insisted, it looks WAY better with the head.  


I can't seem to get a good web.  This doesn't look like Martha's webs. 
 I need to do some more research and figure out how it's done.  


Candy Corn Flowers

I am a little low on easy cupcake design ideas.  Running out of steam after my favorite min-pumpkins.
Kind of feel like I can't top that when it comes to detail.
So now look what I've done.  I wanted to make some fall cupcakes for a lunch party today so here we go.


It's actually a yellow cake mix.  First time I've used that for cupcakes.
Candy corn around a brown mini m&m.  

My 6-year-old did all the candy corn designs!  He's such an excellent helper!

I really think the paper on the tray adds a special touch.


Saturday, October 15, 2011

Mini Pumpkins

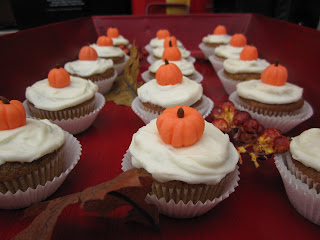
Pumpkin Spice Cupcake, Cream Cheese Frosting, and little fondant pumpkin.  

And NO, the pumpkin is NOT the store-bought variety (aka, round version of candy corn).  

I could have done a green stem or leaf but I wanted to use only oranges and browns for a very earthy look.  I think it turned out well.  When I think of fall colors I see a lot of orange and brown and some reds and yellows.  I know there's always green grass and blue sky but not in my head . . . or in Seattle . . .

And how about the staging?  Annetta inspired me with her little book Plate to Pixel.


Trader Joe's comes through for me once again!  Don't be disappointed, Martha!  I made homemade pumpkin waffles this morning complete with folded-in egg whites!  


The pumpkin bread mix, looking pretty good.


 My pumpkins were accused of looking like the store-bought kind.  Shame!  
Martha would have noticed right away that these are of superior quality and craftsmanship.
I colored white fondant to make orange, then rolled them into balls, squashed them a little, then used a toothpick to create the lines, by laying the toothpick down along the length of the curve.  
Stem is a super tiny piece of pre-colored brown fondant, about the size of those long sprinkle-things.  
I just didn't have any of those sprinkles on hand.  


They were enjoyed at a church appetizer luncheon.  


Sunday, October 9, 2011

Hello Kitty

What fun these cupcakes were!  And they actually turned out alright.  


 I mixed my own pink fondant.  Here's some suggestions for doing it:
1.  Using surgical gloves is recommended so you don't get dye all over your hands.
2.  Use paste food coloring, rather than liquid.  That way it will not get too sticky and wet.
3.  If the fondant gets too sticky or wet, let it air dry for a minute or two or add a little bit of powdered sugar.


 Just thought Maci's little fingers were cute.  When I wasn't looking, she tore into the fondant and stuffed a bunch in her mouth.  She's such a sugar-hog!


 Jayden cut out the flowers for me.  He washed his hands very thoroughly and then let the air dry for about 5 minutes.  Moisture on hands will make fondant work very difficult.


 After the flower is cut it looks like the one on the right.  Taking a little extra time to soften out the edges with your fingertips will be worth the extra effort.  On the left looks much nicer.


 I cut out the ears with scissors and kind of shaped them with my hands.  I ended up making them too big and would recommend that they be more rounded, less long.


 I placed frosting underneath the fondant face to add some moisture and yum to the cupcake.
Use Wilton's "Food Writers" to draw whiskers on the fondant.  Food Writers can be purchased at any craft store in their baking section.   Very cool.


Elise was one of the first little girls to enjoy the fun Hello Kitty mini cake.